
 |
1. Create a new Photoshop document.
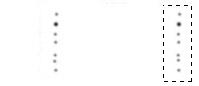
2. Make art for a custom brush: Using the brush tool with the smallest brush, make a series of vertically spaced dots like the enlarged example to the left. Apply the Blur filter. Using the Rectangular Markee tool, select the image you just created; go to the pop-up menu in the Brushes Palette and select "Define Brush." Your new custom brush now appears in the Brushes Palette. You no longer need the brush art–delete the image. |
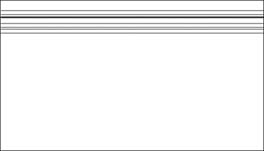 |
3. Go to the Channels Palette and create a new, empty channel. Go to Image > Adjust > Invert (Shortcut: Command-I). Choose the custom brush you created in step 2 above and, with black as the foreground color, draw a horizontal stroke from one side of your image to the other. (Hint: hold down the shift key as you draw to constrain the stroke to a horizontal line.) |
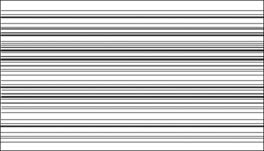 |
4. Continue to draw additional lines until you have the amount of grain you desire. You may overlap the strokes to make the grain denser or more complex. |
| Index |_1_|_2_|_3_|_4_|_5_|__Home | |
| © 1999 Frederick Morris, All rights reserved. © 1999 Frederick Morris, All rights reserved. |
|